I recently acquired a set of “smart” power sockets, mostly to measure power consumption of different devices and appliances in my home. Those sockets labeled “GreenSun” require the use of the VeSync app. I do have a history with wireless power sockets so I wanted to take a slightly deeper look into those devices and see if I can get them to run locally without any cloud requirements.
I’m sharing this in case others want to continue looking into these devices based on these insights and to shed some light on the procedure.
Basic functionality
Inside is an ESP32 chip, the app sends wifi settings to the device via BLE. The device then syncs time from an sntp server and connects to a VeSync mttq server using TLS.
Network provisioning
Step 1: Investigate network traffic
I started with capturing traffic on my router using tcpdump:
sudo tcpdump -s 65535 -w /tmp/network.cap
I provisioned the device, opened the capture in wireshark, and saw that it was
connecting to ntp.vesync.com for the sntp time sync and then to vdmpmqtt.vesync.com.
Since the latter connection was encrypted the journey ended there.

Wireshark screenshot of the initial device setup.
Step 2: Investigate BLE provisioning
To learn more, I needed to understand the bluetooth traffic. Luckily this is fairly straightforward to capture on android.
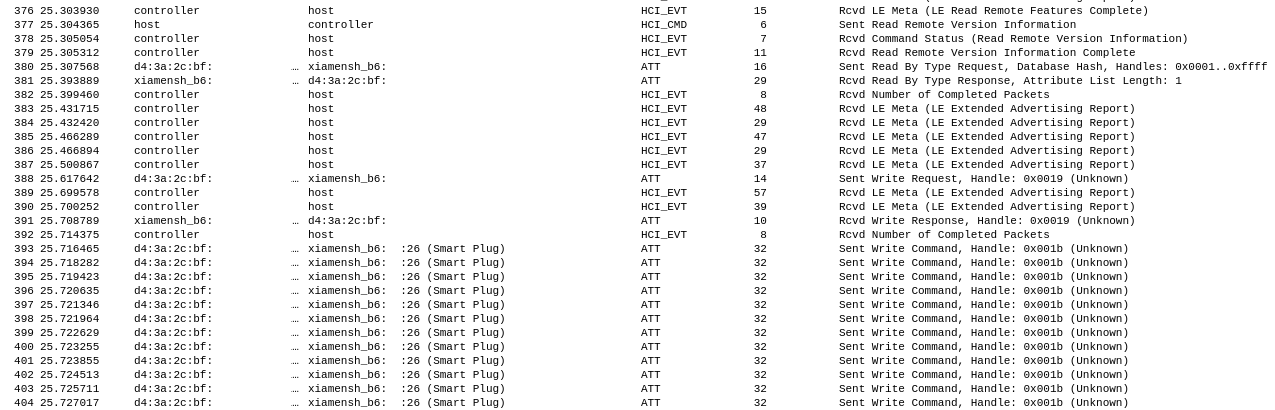
Wireshark screenshot of the bluetooth communication.
To my disappointment that traffic was encrypted as well, so I needed to have a look at the app during provisioning.
I’m a big fan of https://frida.re and used the https://codeshare.frida.re/@fadeevab/intercept-android-apk-crypto-operations which told me plaintexts and ciphertexts as well as keys of crypto operations.
Here’s how the provisioning works (these are almost my raw notes, so feel free to skip over this section)
Key exchange
Phone encrypts using the AES key llwantaeskey1.01
{"key":"-----BEGIN PUBLIC KEY-----\nMIGfMA0GCSqGSIb3DQEBAQUAA4GNADCBiQKBgQDXZsVlb3CUQVJQEpmfCZcDrGYC\nDd8ubE5y2SOGhGvvX69qZVGjCseZWfZsghSiy2ggRk1PQ3jUZeE1wsNkOTkbmqL7\nDN4dMZWuc\/shzfqNXDMKFjPLHbDpJLs+herKg93\/6Xeq9BATxKLZcrXjlRkdhXRX\nWVMqMu1KITq163kZzQIDAQAB\n-----END PUBLIC KEY-----\n"}
Sends it to the plug, along with unknown header: a5 22 00 34 01 47 01 00 80 00
Phone receives header: a5 12 00 74 01 ea 01 00 80 00
- the following payload:
bebaf6c2551919221d75e746f049769e3498379344f4dd29fb427e87c88343a16bb306a71a518b4ffbc17cbe2efc9891b9789098dca4ab0897ef4ce7e1e87775f037a93425225a2d024fb24a41e04b964dfc4d2909fd54259fad0e322c6fe963c4357fb571d731faaff22ebae571ad36a953fc22f1066e00e1f677b9cacf38c7052e2833d637af1c3601a53cf711da0384d8937587d129d513948ba50fb3218da8acc05c6aa5768777607150575bf0418f81ae80b1aa5a08b6691cc0fa66bc3995ad38daf77afe9688bbfa293f75e20e23d7b660689841852080ed7e4410d62a4404898f22981351c0adfca06c27e5e24137e5677113de8bd462844f17967a259c51b355c5b48cfc4281513ff11c8fcec1730c94063c76ed6c2de1e524e1f6a9813c163bc86fb92086057972f5125e8720caeec39a841da5eaef5a994102daec8d01ecf65d1e232926a762098db2e940f9f2054786b81f519e2214674abd2f3aa5f84bf3092859f7061c981b40396301
This decrypts to:
{
  "key":"KJ+z/4Dwjzlzz+mkpnqFcphiF5Jx9apfxMLIgtRus2DtdX7VoKD4AvlgPFHOWmwVHZSkQkgIhK+JrPDWgH9rHcedtMJyoBDZQbE2VKS5lj1S+jlAfQTN1AeJdfgkl/2mFjNTN1hDtJTay7jgaCOCfpYqtHacapjuiG38Rj/trNk=",
  "iv": "KJ+z/4Dwjzlzz+mkpnqFcphiF5Jx9apfxMLIgtRus2DtdX7VoKD4AvlgPFHOWmwVHZSkQkgIhK+JrPDWgH9rHcedtMJyoBDZQbE2VKS5lj1S+jlAfQTN1AeJdfgkl/2mFjNTN1hDtJTay7jgaCOCfpYqtHacapjuiG38Rj/trNk="
}
And is then RSA decrypted to: 954241cc52fbbd1cda73a5d7b81c141e
Device setup
Wifi Discovery
Phone uses AES session key to encrypt:
{"page":1,"needScan":0}
- 0x8011: OP_QUERY_WIFI_LIST
- Header:
a5 22 01 24 00 a0 01 11 80 00 - Data:
8db66ee10746e23948c2d00197c5ab6743ce139dc0ac7fd7289ab54ba12397fe(len=64, 0x40)
Device returns encrypted wifi list:
- Header:
a5 12 01 94 00 a6 01 11 80 00
{"result":0,"totalPage":1,"currentPage":1,
 "wifiList":[{"SSID":"Foo","AUTH":7,"RSSI":-83},{"SSID":"WLAN-BAR","AUTH":3,"RSSI":-94}]}
Phone sends ACK(?): a5 22 02 04 00 a1 01 10 80 00
Device returns:
- Header: `a5 12 02 b4 00 88 01 10 80 00``
{"firmVersion":"1.0.01","deviceType":"WHOGPLUG","cid":"[redacted]",
 "networkStatus":0,"accountId":"","deviceMac":"fc:58:4a:b6:XX:XX","deviceRegion":"EU"}
Another ACK(?): a522030400a001108000
Phone sends device configuration packet:
{"accountID":"12371234","configKey":"0NgoR2xbyTJKFmP1","serverDN":"vdmpmqtt.vesync.com:2883",
 "serverIP":"52.45.138.182","wifiSSID":"Foo","wifiPassword":"[redacted]","needReset":1}
Device responds with:
{"step1":"DEV_RECEIVE_APP_DATA","deviceCid":"[redacted]","deviceMac":"fc:58:4a:b6:XX:XX","firmVersion":"1.0.01","routerMac":"XX:XX:3a:63:XX:XX","routerRssi":-83,"free_heap":53568}
{"step2":"DEV_CONNECTED_WIFI","routerMac":"00:00:00:00:00:00","routerRssi":0,"free_heap":46584}
{"step2":"DEV_CONNECTED_WIFI","routerMac":"XX:XX:a6:54:XX:XX","routerRssi":-61,"free_heap":47288}
Header opcodes
    public static final int b = 2;
    public static final int c = 1;
    public static final int d = 32768;
    public static final int e = 32784;
    public static final int f = 32785;  // 0x8011
    public static final int g = 32786;
    public static final int h = 32787;
    public static final int i = 32788;
    public static final int j = 32789;
    public static final int k = 32790;
    public static final int l = 32791;
    public static final int m = 32792;
    public static final int n = 41577;

    OP_KEY_EXCHANGE(a.d),
    OP_QUERY_INFO(a.e),
    OP_QUERY_WIFI_LIST(a.f),
    OP_SEND_CONFIG_INFO(a.g),
    OP_CONFIG_RESULT_REPORT(a.h),
    OP_CONNECT_INFO_REPORT(a.i),
    OP_CONNECT_FAIL_REPORT(a.j),
    OP_CANCEL_CONFIG(a.k),
    OP_QUERY_CONFIG_LOG(a.l),
    OP_UNKNOWN(4369);
- Business Header: version, opcode, statuscode
- Protocol Header: version, flag, sequenceId, payloadLength
Step 3: Faking the provisioning
The frida code already showed me plain and ciphertexts so it was trivial to change texts that go into encryption allowing me to specify my own MQTT server, which would be a major milestone towards my goal of having the device work exclusively locally.
Unfortunately for me my self-signed certificate was rejected by the device.

Wireshark screenshot of the TLS exchange failing with a 'Bad Certificate' error.
Into the firmware
To see if there are any further options I wanted to look at the firmware. Since I couldn’t find it online, I tried to look into the APK again.
I used the excellent httptoolkit to capture the vesync network traffic. To overcome SSL pinning I turned to frida again. I tried the standard unpinning code, but they didn’t work completely until I tweaked them to add some APIs they were missing.
		var Platform = Java.use('com.android.org.conscrypt.Platform');
		var checkServerTrusted = Platform.checkServerTrusted.overload('javax.net.ssl.X509TrustManager', '[Ljava.security.cert.X509Certificate;', 'java.lang.String', 'com.android.org.conscrypt.AbstractConscryptSocket');
		checkServerTrusted.implementation = function(a, b, c, d) { console.log('[+] Bypassing conscrypt.Platform'); }
		var checkServerTrusted2 = Platform.checkServerTrusted.overload('javax.net.ssl.X509TrustManager', '[Ljava.security.cert.X509Certificate;', 'java.lang.String', 'com.android.org.conscrypt.ConscryptEngine');
		checkServerTrusted2.implementation = function(a, b, c, d) { console.log('[+] Bypassing conscrypt.Platform2'); }
This allowed me to see the RPCs/API calls that the VeSync app was making during device provisioning.
https://github.com/webdjoe/pyvesync/files/13043450/greensun-whogplug.txt
This is also useful, because now code for pyvesync can be written to at least support the cloud API of that device in commandline utilities or homeassistant.
Unfortunately no firmware link was provided in the respective API response, so this was another dead end.
I then learned that on http://testonline-fw.vesync.cn/ all the firmware for VeSync devices is available and I found mine there.
An analysis of the firmware files showed that those are again encrypted. Their header contais a 47-byte ascii sequence of hexadecimal data.
$ hexdump -C WHOGPLUG_S_UN_ota_v1.0.00.rel.bin  | head -n 20
00000000  01 86 62 5f 83 88 8c 0c  e6 79 3a 80 3e 35 ff c7  |..b_.....y:.>5..|
00000010  52 6d 9a 17 8b e9 de 20  83 bd b0 31 80 2a c2 ad  |Rm..... ...1.*..|
00000020  fe 3e a4 8f 31 9b 6a d8  9c 47 b8 ba 16 74 2c cf  |.>..1.j..G...t,.|
00000030  64 54 1e 7e 3e 36 99 36  56 94 70 57 af c9 7c 3f  |dT.~>6.6V.pW..|?|
00000040  a4 30 2b 5e c1 92 e7 a9  7a 7d 45 c2 01 5c eb 1e  |.0+^....z}E..\..|
00000050  e2 9b 6e 5f a3 91 ec 7e  b4 db d5 18 73 d3 e1 cb  |..n_...~....s...|
00000060  a3 48 4a 81 76 70 d5 f4  ab 8b 3b c8 1f 48 fa 10  |.HJ.vp....;..H..|
00000070  3b 6e db e1 8e 43 39 e2  c0 1a 78 ce c9 d0 24 b3  |;n...C9...x...$.|
00000080  a0 52 42 4c 00 02 01 00  00 89 3d d3 64 61 70 70  |.RBL......=.dapp|
00000090  00 80 7b 5e cf d9 7f 00  00 70 64 5f 01 35 38 33  |..{^.....pd_.583|
000000a0  44 36 39 43 31 43 34 37  44 44 36 38 35 35 41 43  |D69C1C47DD6855AC|
000000b0  33 41 32 36 35 30 30 30  30 30 30 30 30 30 30 30  |3A26500000000000|
000000c0  30 30 30 30 30 30 30 30  30 30 30 30 00 c8 d2 33  |000000000000...3|
000000d0  0b 37 c0 64 e8 88 34 0f  00 80 30 0a 00 24 fc f5  |.7.d..4...0..$..|
000000e0  c5 79 67 eb 52 88 15 4b  89 d0 a3 61 39 89 2f 23  |.yg.R..K...a9./#|
000000f0  a3 7b cf f6 66 9d d1 d1  9b be e7 8a 4a df 0a fe  |.{..f.......J...|
The first 24 bytes are not 0, so I checked if those could be an 192-bit AES key or a 96-bit 3DES key, but this was a dead-end so far. If anyone knows more, I’m curious so please let me know!
Within the other firmwares there was an elf file with debug data that caught my eye. I found the implementation of the provisioning code there. Unfortunately there are no hidden params to enable a more permissive debug mode or so (as found by Cisco Talos in previous versions).
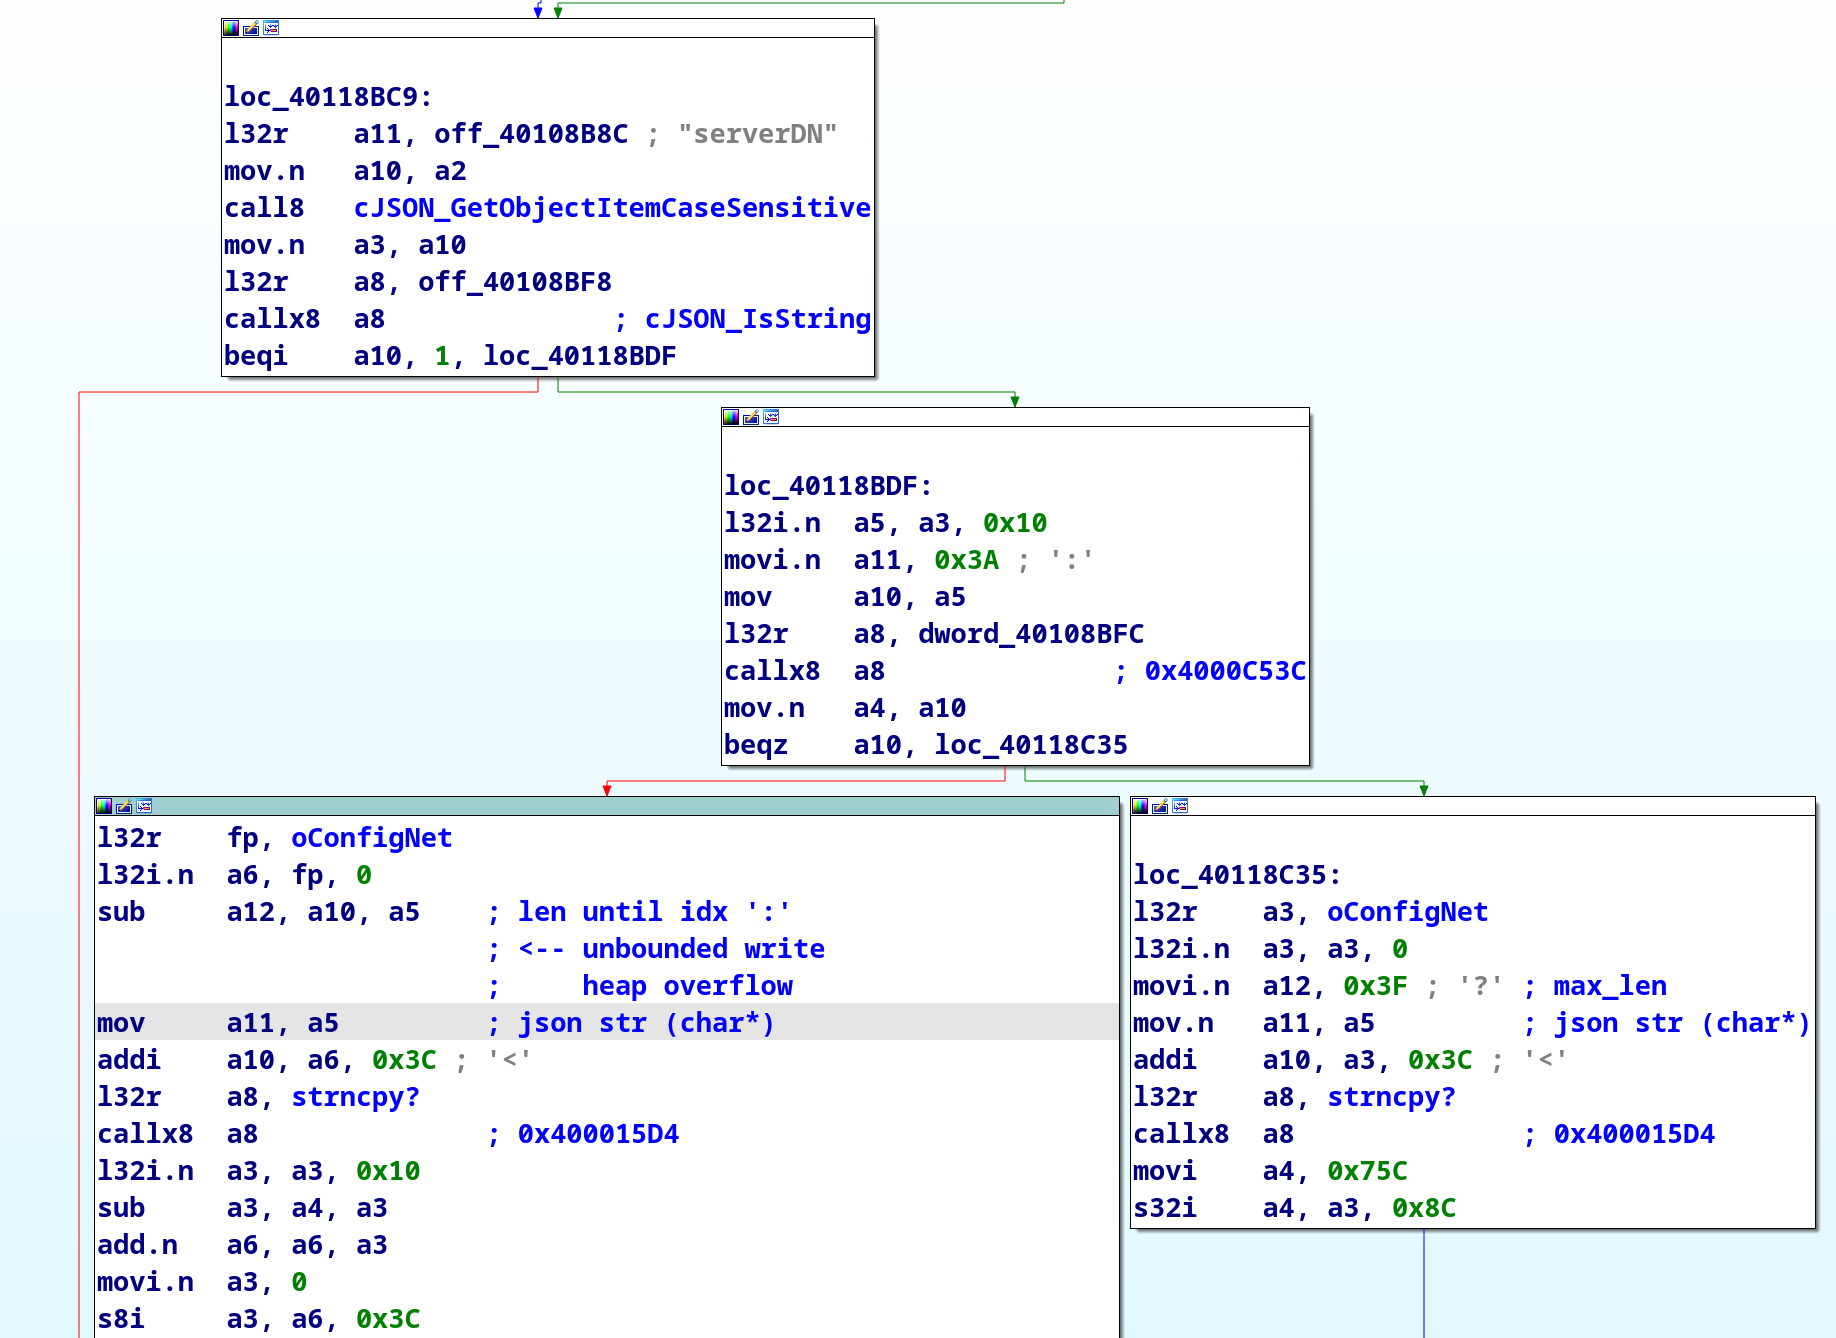
IDA Pro screenshot of the parsing code
When parsing the serverDN attribute, the code is looking for a : and
if found copying the server name to the net_info_t.mqtt_config structure.
00000000 mqtt_config_t   struc ; (sizeof=0x90, align=0x4, copyof_1541)
00000000                                         ; XREF: net_info_t/r
00000000 pid             .byte 20 dup(?)
00000014 configKey       .byte 40 dup(?)         ; XREF: .flash.text:off_40108F80/o
00000014                                         ; .flash.text:off_40108F84/o
0000003C serverDN        .byte 64 dup(?)         ; XREF: .flash.text:off_40108F88/o
0000003C                                         ; .flash.text:off_40108F8C/o
0000007C serverIP        .byte 16 dup(?)
0000008C serverPort      .int ?
00000090 mqtt_config_t   ends
The structure is allocated on the heap and has 64 bytes reserved for this string. Since there don’t seem to be any length checks, I’m fairly certain that this would allow to overwrite other heap with a respectively crafted device provisioning package.
What’s next
Code execution?
If I had unlimited time, I would now love to flash the debug elf file to a spare ESP32, learn all about its heap layout and build an exploit to (hopefully) gain code-execution from there. This would be very time-consuming so I have to stop here, but I’m hoping someone else is up to the challenge and maybe one day we’ll have local control for those devices.
Checking CA keys
Another yet unexplored venue are keys or certificates within the firmware. Maybe one is either the CA private key or a certificate with key that was signed by the CA.
Manual flashing of alternate firmware
It’s probably possible to open the sockets and manually flash Tasmota or other software to the device. However, I didn’t want to physically mess with the device (after all it’s 230V plug) and the ESP32 has a bunch of protections like secure boot that may make it impossible to flash other firmware (without resolving to fault injection as I’ve previously done for other chips).