
Update: For everyone coming here just looking for a way to root their Mijia STYJ02YM (viomi-v7) or Mijia STYTJ02YM (viomi-v8), please head to https://github.com/rumpeltux/viomi-rooting.
My motivation to get root access is to have a talking and blinking robot that can move through my flat and is independent of any cloud.
Whatever your reasons, so far it’s not supported by dustcloud, although I already added support to python-miio which allows to remote control most functionality through a python cli.
Luckily, it turns out not to be too hard to get root access (all this is with the 3.5.3_0044 firmware, but newer ones should work as well):
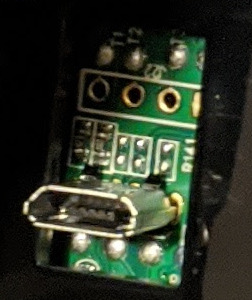
After opening four screws, we see a micro USB port.
If we attach a USB cable, we learn that during boot of the robot an adbd host is briefly available:
[0.465573] usb 1-1: new high-speed USB device number 77 using xhci_hcd
[0.617860] usb 1-1: New USB device found, idVendor=18d1, idProduct=d002, bcdDevice= 2.33
[0.617863] usb 1-1: New USB device strings: Mfr=2, Product=3, SerialNumber=4
[0.617864] usb 1-1: Product: Android
[0.617865] usb 1-1: Manufacturer: USB Developer
[0.617866] usb 1-1: SerialNumber: 20080411
[1.076411] usb 1-1: USB disconnect, device number 77
Unfortunately:
- it doesn’t expose a working shell.
- it’s only available very briefly (up to ½s if one is lucky), so I need to wrap all adb commands
in
while true; do adb …; doneloops.
1. Fixing the shell
If you run adb shell you’ll get a login prompt (not very helpful):
TinaLinux login:
If you run adb shell [somecommand] you get a weird error:
login: invalid option -- 'c'
However, you can use adb pull to inspect (small) files. So lets have a look.
while true; do adb pull /bin/adb_shell |grep -v "failed to get feature"; done
This may take a few tries, until the file reveals its content. It includes the line /bin/login -c "$2".
/bin/login doesn’t take a -c flag, thus the error earlier.
To fix this, we create our own version of this file (the following commands create the file and set required permissions, so run it in your shell instead of pasting it into a textfile):
cat >adb_shell <<"EOF"
#!/bin/sh
export ENV='/etc/adb_profile'
exec /bin/sh "$@"
EOF
chmod +x adb_shell
And push it (adb push is also allowed and we can permanently modify the root filesystem, how nice is this!):
while true; do adb push -a adb_shell /bin/adb_shell |grep -v "failed to get feature"; done
2. Keeping ADB alive
Something is killing adb immediately after it starts. After inspecting the firmware for a while I find a candidate:
$ strings usr/sbin/RobotApp | grep android_usb
echo 1 > /sys/class/android_usb/android0/enable
echo 0 > /sys/class/android_usb/android0/enable
/sys/class/android_usb/android0/enable
The second line is what turns off the adbd.
The fix is “easy”, we disable all the vacuum services by running adb shell rm /etc/rc.d/S90robotManager.
Now we got a root shell and can explore and modify the system at ease.
BusyBox v1.24.1 () built-in shell (ash)

 _____  _              __     _
|_   _||_| ___  _ _   |  |   |_| ___  _ _  _ _
  | |   _ |   ||   |  |  |__ | ||   || | ||_'_|
  | |  | || | || _ |  |_____||_||_|_||___||_,_|
  |_|  |_||_|_||_|_|  Tina is Based on OpenWrt!
----------------------------------------------
Tina Linux (Neptune, 57513AA3)
----------------------------------------------
root@TinaLinux:~#
3. Installing ssh
To get ssh working we first need a dropbear binary. The vacuum runs “Tina Linux” which is an openwrt version for the allwinner SoC. IIUC the board is very similar to the so-called “banana pi”.
There are open source repositories to build tina linux, however the build process is super fragile and doesn’t run on recent systems as it requires specific host headers.
First grab the repo and prepare the build:
repo init -u https://github.com/tinalinux/manifest -b r16-v2.1.y -m r16/v2.1.y.xml
repo sync
. build/envsetup.sh; lunch astar_parrot-tina
make menuconfig
Eventually I was able to setup a functioning docker environment:
FROM ubuntu:trusty
ENV DEBIAN_FRONTEND noninteractive

RUN apt-get update -q && \
    apt-get install -qy build-essential gawk unzip wget git-core ncurses-dev libssl-dev python-setuptools zlib1g-dev
WORKDIR /data
VOLUME ["/data"]
Inside the container you can now:
. build/envsetup.sh; lunch astar_parrot-tina
make
To save you the trouble, here’s the opkg package:
To install it run:
adb push dropbear_2015.71-2_sunxi.ipk /tmp
adb shell opkg install /tmp/dropbear_2015.71-2_sunxi.ipk
adb push ~/.ssh/id_rsa.pub /etc/dropbear/authorized_keys
adb shell chmod 0600 /etc/dropbear/authorized_keys
adb shell sed -i "/PasswordAuth/ s/'on'/'off'/" /etc/config/dropbear
The last line disables password authentication which is a good thing, because the default password is @3I#sc$RD%xm^2S&.
So you may also want to change it using passwd.
Lastly, we restore the robot app:
adb shell
cd /etc/rc.d
ln -s ../init.d/robotManager S90robotManager
# And to celebrate:
tinyplayer /usr/share/audio/english/sound_test_ready.mp3
Blinking lights
The robot only supports a few predefined modes for the LED. It seems like the actual control is abstracted behind further hardware that implements a serial interface.
The set_light miio command only can turn the light off or on, but nothing else.
RobotApp sends the command to everest-server (which includes all the meaty logic like navigation etc)
and then constructs the RobotControl message that it sends to AuxCtrl which forwards it to /dev/ttyS3.
echo -e "\xfa\xfb\x04\x8d\x05\x8d\x05" > /dev/ttyS3
0x8d is the LedControl command. 0x05 is the LED-state. (0x04 is the length of the payload, the last two bytes are probably a checksum)
Here’s a list of LedControl commands:
| state | effect |
|---|---|
0x00 |
off |
0x03 |
yellow on |
0x04 |
yellow fade (as when charging) |
0x05 |
yellow blink twice, fast |
0x06 |
yellow blink normal |
0x07 |
red on |
0x08 |
red blink |
0x0a |
red yellow blink |
0x0b |
white blink |
0x0c |
white fade (slow) |
0x0e |
white fast flashes |
0x0f |
red blink |
0x10 |
red blink (slow) |
0x11 |
pinkish |
0x12 |
orange (dark / redish yellow) |
What’s next?
Rooting enables a couple of things that weren’t easily possible before:
- Disable cloud / auto-updates: so far updates only happened after explicit consent, but the cloud could push a new firmware anytime and take away root access.
- Add support for the viomi-v7 in dustcloud.
(Alternatively at least patch
miio_clientto listen on the LAN interface, since some functionality (e.g. OTA commands, map uploads) are only available on the cloud interface.) - Add support for the viomi-v7 in Valetudo to get nice non-cloud control UI (I won’t have time for this, but would really love to see it happen!)
Update: I did have some time for this, so Valetudo has now some initial support for the viomi devices, though not all UI actions are fully functional. - A rooting method that doesn’t require hardware access would be nice.